POC:使用ChatGPT多模态实现App登录

App 登录

为了限制一下模型的操作,我们把可能的区域用数字做了标记区分。

1
2
3
4
5
6
7
8
9
10
11
12
13
14
15
16
17
18
19
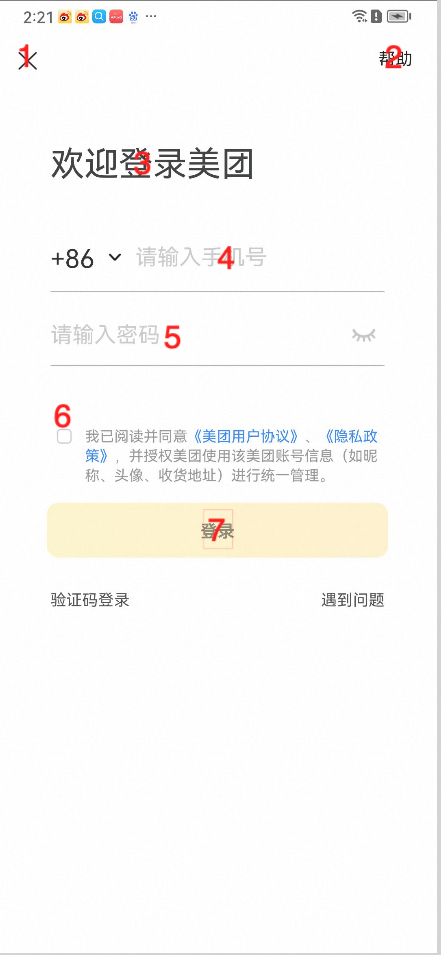
>> Question with Image
You are given the Android screenshot. I need to input the (username or phone number) in order to complete the login step. The possible tap positions are marked as numbers with red color. You need to choose the right number to tap and input.

>> Answer
Based on the screenshot you provided, it looks like the numbers are indicating potential tap points. For entering a username or phone number to log in, you would want to tap where the input field is. In the screenshot, it appears that the input field for the phone number or username is located next to "+86" with a placeholder text that likely suggests entering the phone number.

From your description, the correct number to tap to input the username or phone number is marked with the number 4 in red color. Tap on this number to bring up the keyboard and enter your details.

>> Question
I need to input a password. Can you provide guidance on which number positions I should tap?

>> Answer
For entering the password, the correct tap position based on the screenshot you provided earlier would be where the placeholder text indicating the password field is located. In your screenshot, this placeholder for the password is marked with the number 5 in red. So, you should tap on number 5 to enter your password.

>> Question
Now I need to click login button. output the number which should tap

>> Answer
Based on the layout of the login screen in the screenshot you provided, the login button is located at the bottom of the screen in a yellow rectangular button. From the description of the numbers marked in red, the login button is marked with the number 7. Therefore, you should tap on number 7 to proceed with logging in.

当我询问如何输入用户名的时候,GPT 给出了正确的位置 4,而需要输入密码的时候,GPT 给出的正确的位置 5.
这个有两个关键点

  1. 标记处图片中可以点击的点
  2. 使用恰当的 Prompt 来让 GPT 输出正确的结果。

当前 Activity:com.meituan.passport.LoginActivity
根据 GPT 给出的内容生成脚本

  • Tap //*[@resource-id=”com.sankuai.meituan:id/passport_mobile_phone”]
  • Input 电话号码
  • Tap //*[@resource-id=”com.sankuai.meituan:id/edit_password”]
  • Input 密码
  • Tap //*[@resource-id=”com.sankuai.meituan:id/login_button”]

自驾游要带的东西

如果有段很长的假期,开车去旅游,可以去到很多地方,看美丽的风景,品好吃的食物,爬祖国的名山。但是自驾游之前需要多准备一下,这样才能让旅行更快乐。下面是我根据此次春节广西自驾游的经验总结要带的一些东西,以及一些不需要带的东西。分类讲一下

阅读更多

磁吸上水器使用教程

注: 因测试需要有部分残留水渍属正常现象

接引水管

水管插入水箱,建议从水箱进气口直接插进去。如下图所示

使用图解

poetry下载包报hash错误原因排查

问题

执行 poetry install 的时候出现 sha256 校验失败

排查

猜测 1:是不是 pypi 源出问题了

因为我用的是自建的 pypi 代理,https://github.com/EpicWink/proxpi/ 能将包缓存到本地,提高下载速度。
先换掉本地代理,直接走官方源 pypi.org 试试,哎,正常了。
可是官方源慢啊,必须得走 pypi 代理呀,所以一定要找出来 pypi 代理出啥问题了

猜测 2: 难道是 pypi 上的包不对?

直接去代理的地址找到对应

1
2
$ find . | grep colored | xargs sha256sum
04ff4d4dd514274fe3b99a21bb52fb96f2688c01e93fba7bef37221e7cb56ce0 ./pypi/files-pythonhosted-org/packages/f3/d6/00203998f27ab30b2417998006ad0608f236740bb129494dd7c5621861e1/colored-1.4.4.tar.gz

看 hash 值也没问题,跟 pypi.org 上的一样

猜测 3:说不定是 poetry 的本地缓存出问题了

先是调用了一下 poetry 自己的命令,清空自身缓存

1
2
$ poetry cache clear . --all
$ poetry install

没效果。还是报一样的错误

猜测 4:说不定代理没有读本地文件,直接读的内存

先重启一下代理服务,下包试试

1
2
$ wget -q https://pypiproxy.example.com/index/colored/colored-1.4.4.tar.gz -O- | shasum -a256
04ff4d4dd514274fe3b99a21bb52fb96f2688c01e93fba7bef37221e7cb56ce0

看起来没什么问题,hash 正确。
再试试 poetry 清缓存,然后 install,依然报错。

猜测 5:poetry 莫非还有没清的缓存

直接翻源码,一路找到代码下载的位置
https://github.com/python-poetry/poetry/blob/2b50120c86ae72781357411342f2feda0a4e2713/src/poetry/utils/helpers.py#L141

增加一行

1
print("Download", url, dest)

最后发现,确实下载了。但就是下载的文件 sha 值不对。
解压包试试呢 tar -xzvf colored-1.4.4.tar.gz,简单的看了一下,内容是对的。没什么问题。

猜测 6:难道是 requests 出问题了

这个想法我自己都觉的离谱,requests 怎么可能出问题
让 GPT 写一个通过 requests 下载代码并校验 sha256 的功能看看, GPT 效率非常的高,很快就写好了

1
2
3
4
5
6
7
8
9
10
11
12
13
14
15
16
17
18
19
20
import requests
import hashlib

url = "https://pypiproxy.example.com/index/colored/colored-1.4.4.tar.gz"
filename = "colored-1.4.4.tar.gz"

r = requests.get(url, stream=True)

if r.status_code == 200:
with open(filename, "wb") as f:
for chunk in r.iter_content(chunk_size=1024):
f.write(chunk)

print(f"File '{filename}' downloaded successfully.")

# Calculate SHA256 hash
sha256_hash = hashlib.sha256(open(filename, "rb").read()).hexdigest()
print(f"SHA256 hash: {sha256_hash}")
else:
print("Failed to download the file.")

执行后输出什么呢

1
2
3
$ python download.py
File 'colored-1.4.4.tar.gz' downloaded successfully.
SHA256 Hash of the downloaded file: b7b48b9f40e8a65bbb54813d5d79dd008dc8b8c5638d5bbfd30fc5a82e6def7a

看来 requests 有问题,可为什么文件是一样的呢?太奇怪了。
让 GPT 重写一下代码,将 requests 替换为 urllib 下载。
没想到下载到的文件 hash 竟然又对了。看来问题就出在 requests 上,但是就是不知道为什么。问 GPT4 也没给出什么有用的答案。
既然如此,代理上的那个 colored-1.4.4.tar.gz 文件,直接改成 hello 文本。我倒要看看 requests 怎么整出来不同的文件 hash

1
echo hello > colored-1.4.4.tar.gz

视角转到自己的电脑上,执行命令,出现了。下载报错

1
2
$ python download.py
requests.exceptions.ContentDecodingError: ('Received response with content-encoding: gzip, but failed to decode it.', error('Error -3 while decompressing data: incorrect header check'))

到这里终于看到了成功的曙光了。问题原因出在 requests 下载的时候会自己 decode 呀。
之前下载的那个 colored-1.4.4.tar.gz 用 file 命令看看

1
2
$ file colored-1.4.4.tar.gz
colored-1.4.4.tar.gz: POSIX tar archive (GNU)

我擦,果然是 tar 文件。破案了,原来是,requests 直接帮忙把 tar.gz 解压了成 tar 文件了,但是文件名没改。难怪外表看起来一样,但是 hash 一直不对。

结论

requests 库下载文件的时候,会自动把 tar.gz 解压了成 tar 文件了,导致 hash 一直不对。更换 urllib 获取直接 curl 请求的下载就是正确的。

问题修复

修复方案 1

既然是 requests 自动解压了,那就想办法把 Content-Encoding: gzip 从服务端先去掉吧。让 requests 不自动解压。
查看了一下我那个代理的源码文档。有一个配置看起来可以。

再看 flask 的源码,发现只要设置了 mimetype,Content-Encoding 就不会设置。

修改完之后,重启 proxi 代理测试一下

1
2
3
4
5
6
7
8
9
10
11
12
13
$ http HEAD https://pypiproxy.example.com/index/colored/colored-1.4.4.tar.gz
HTTP/1.1 200 OK
Cache-Control: no-cache
Connection: keep-alive
Content-Disposition: inline; filename=colored-1.4.4.tar.gz
Content-Length: 36786
Content-Type: application/octet-stream
Date: Thu, 23 Nov 2023 03:05:09 GMT
ETag: "1700647547.9076493-36786-988557199"
Last-Modified: Wed, 22 Nov 2023 10:05:47 GMT
Server: gunicorn
Strict-Transport-Security: max-age=31536000
X-protocol: HTTP/1.1

这里看到 Content-Encoding 不见了。
再次测试一下 poetry,先清缓存再 poetry install。终于不报错误了。完美

修复方案 2

改一下 poetry,让其使用 requests 下载的时候不再自动解码

1
2
3
4
5
6
7
8
9
# Ref: https://stackoverflow.com/questions/18364193/requests-disable-auto-decoding
import requests

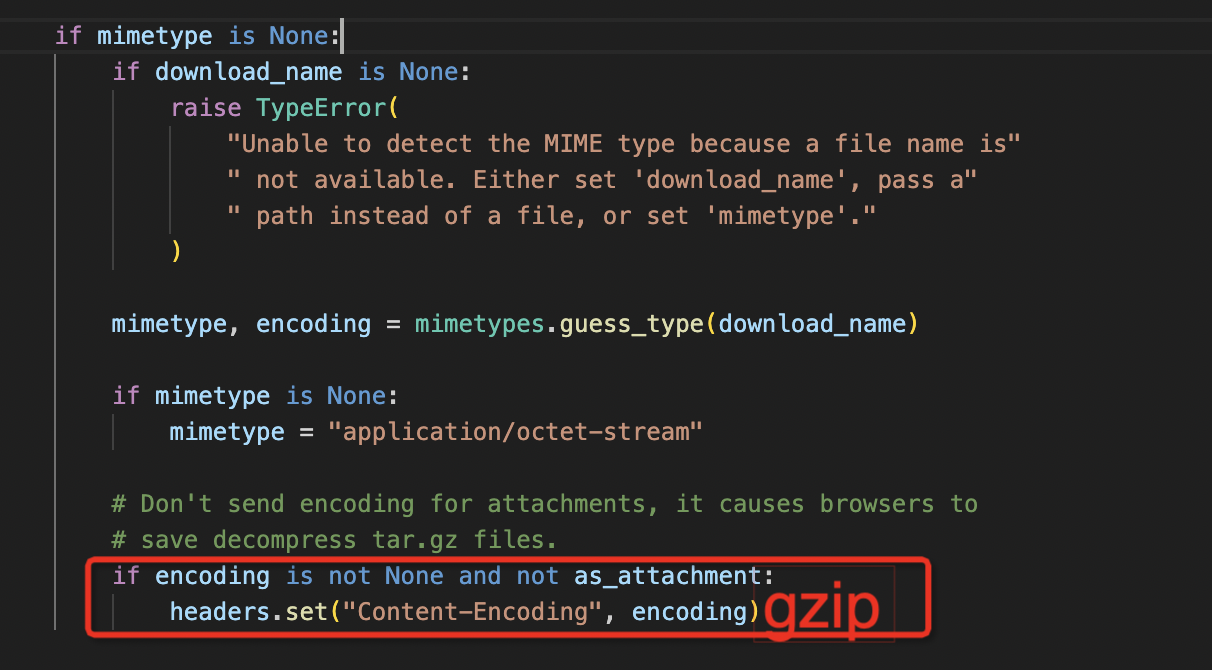
url = https://pypiproxy.example.com/index/colored/colored-1.4.4.tar.gz
r = requests.get(url, stream=True)
with open(local_filename, 'wb') as f:
for chunk in r.raw.stream(1024, decode_content=False):
if chunk:
f.write(chunk)

相关 issue
https://github.com/python-poetry/poetry/issues/4523

Python AES加解密

简介

高级加密标准(Advanced Encryption Standard: AES)是美国国家标准与技术研究院(NIST)在 2001 年建立了电子数据的加密规范。其是对称加解密算法的最经典算法之一,它是一种分组加密标准,每个加密块大小为 128 位,允许的密钥长度为 128、192 和 256 位。这里只介绍 ECB 加密模式。
AES 加密模式:ECB/CBC/CTR/OFB/CFB
填充:pkcs5padding/pkcs7padding/zeropadding/iso10126/ansix923
数据块:128 位/192 位/256 位

使用

安装依赖

1
2
3
4
5
# For Linux and Darwin
pip install pycrypto

# For windows
pip install pycryptodome

比较遗憾的是,Python 的 PKCS5 的实现需要自己来,虽然也不是太难。不过有点麻烦
具体实现

1
2
3
4
5
6
7
8
9
10
11
12
13
14
15
16
17
18
19
20
21
22
23
24
25
26
27
28
29
30
31
32
from Crypto.Cipher import AES

def pad(s: str) -> str:
""" padding PKCS5 """
block_size = AES.block_size # always 16
return s + (block_size - len(s) % block_size) * chr(block_size - len(s) % block_size)


def unpad(s: bytes) -> str:
""" Unpadding PKCS5 """
return s[:s[-1]].decode('utf-8')


def encrypt(s: str, password: bytes) -> bytes:
cipher = AES.new(password, AES.MODE_ECB)
return cipher.encrypt(pad(s).encode('utf-8'))


def decrypt(hex_string: str, password: bytes) -> str:
raw = bytearray.fromhex(hex_string)
cipher = AES.new(password, AES.MODE_ECB)
pad_string = cipher.decrypt(raw)
return unpad(pad_string)


if __name__ == "__main__":
password = b"1234567890123456"
v = encrypt("Hello world", password)
secret_message = v.hex()

message = decrypt(secret_message, password)
print("Message is", message)

参考链接

https://juejin.cn/post/7026635907742564365

寻乌蜜桔

介绍

卖朋友自家果园赣南脐橙第九年,立冬之后,赣南脐橙终于到了口感最好的时候,今年橙子产量高,品质更好,汁水更多,还是一如既往的甜,没有买的可以尝尝啦,每一颗橙子都是果农一大早从山上挑下来的,根据大小分装,然后当天打包,当天发货,保证最好的新鲜度。(中通、圆通)

产品有以下特点

  1. 国家地理标志产品,原生态种植,不打甜蜜素,不催熟,不打蜡,不泡药~
  2. 无籽率 99.999%,孩子老人可以放心吃!
  3. 补充 VC,提高免疫力

历史的销售记录也非常的不过,曾经在阿里内网一度非常的畅销。不过因为一些原因访问不了阿里内网了,上年的链接没法贴了。

实拍图片


购买方式

微信扫码(快团团购买)

微信售后群,有任何问题都可以快团团留言,或微信群里沟通。
我们在售后这一块是非常的在意复购率,所以对于每个产品的售后都非常的重视。

金幼账单

记录金辰之光小一班的入账出账信息

阅读更多

内蒙古草原旅行记

时间 7 月


有时出发去旅行,往往只需要一个很简单的理由,而我的理由就是还有几天假期快过期了。

整体行程

28 日高铁到达北京南站,一嗨租车租好了车(本田 CRV,后面会详细的介绍一下这辆车,这确实是辆好车),附近找了个酒店(喆啡酒店)修整一天,并在当晚体验了一下北京的涮火锅(很好吃)。
29 日(周六)早晨简单买了个早饭就上路了,一直开到金山岭长城服务区与好友汇合。29 日接近下午的时候到达第一站:乌兰布统,快要到达目的地的那段路非常的堵,很多人已经开始下车步行去酒店了,只留下一个司机在车上慢慢的开。我们的车后来也效仿了这种做法。可能是因为周六吧,真的是非常的非常的堵。

不过到达酒店的时候天色还早,带娃去骑了个马,不过后面几天不愿意骑了,不知为何。后来朋友也过来了,我们一起爬上了草原上的一个小山头,娃很兴奋,直接爬上了山顶,看了一下草原的日落。
30 日(周日)周围的路还是堵的厉害,所以上午就在酒店后的草原看羊,玩沙子。走路时要小心不要踩到马的便便,草原上到处都是。中午的时候堵车没这么严重了,午饭吃完,直接开车出门,去了一个景点桦木沟(看了下那里的蛤蟆坝、桦木林),虽然景色也不是太别出众,但是可能因为是新环境,娃还是玩的好开心。


31 日(周一)开始出发前往锡林格勒盟,走的是经乌线-热阿线-达达线。路上发现有卖西瓜的,直接路边停车整了一个,3 个大人两个小孩,以为能把一整个吃完,结果吃了一半就实在吃不动了。路上的风景很不错,又有树林,又有草原,空气好,视野很清晰,还看到有人在玩滑翔伞。

有段路是盘悬着开到山上,又盘悬着开到山上,然后又开下去。由于风景太美,于是在一个路口下来,拍了个照。可是那里的日照太强,只敢呆了一会就跑回了车里。遇到一个老大爷,建议我们去热水塘那里住上一晚。继续上路走啊走啊,还真遇到了一个叫热水塘的小镇子。里面的酒店一看就很上档次。要是能出发前就遇到大爷就好了。开到了热阿线上,还发现一个又意思的村子,名字叫很黑村,看村里面的人真的很黑,哈哈,或许是因为这里的紫外线实在是太强了。到达达线的时候,遇到了几个奶牛,停车跟奶牛唠个嗑,跟奶牛近距离接触的时候,牛回直接转头盯着你,压迫感非常的强,加上头上的两个牛角,所以不敢靠的太近,之前去摸一摸的想法也随之消失了。跟马的便便比起来,牛的便便又软又臭,我很不喜欢。

继续往前开,就能看到大片一望无际的草场了,跟乌兰布统比没什么山头,真的是一望无际,天上的云彩感觉都非常的低。在上高速之前,在附近的一个草场我们停了下来,把车上剩下没吃完的西瓜,全部吃光。然后就上高速了,高速限速 100,看了之后,我郁闷一笑,老子在国道上都开 120 的人,在高速还只能开 100,要这高速何用。后来因为高速上实在没什么人,于是我越开越快。最后速度到了 170.

这里不得不提这次租的这个车,是真的牛逼。170 的速度竟然也不怎么晃。最后终于到锡林郭勒盟了,这个城市是真没什么好玩的,主要的风景还是在路上。
8 月 1 日(周二)上午在锡林郭勒盟实在玩不动了,开始出发去丰宁。走的海张高速。没想到这个高速还挺好玩的,竟然隔一段距离就设置一个观景台。本以为能赶上台风的暴雨天气,结果就滴了几滴雨,就没了。中间途径了一个叫野狼谷的地方,风很大,门票费一人 60,感觉还挺值的。太阳下山之前我们到达了酒店,这里的酒店做到这一堆的风力发电站周围,有意思的是我们开着车走着走着,竟然直接开到了山顶,一座风力发电站的正下方。

不得不说这个本田 CRV 是真的牛逼,这么垃圾的路都能开。
8 月 2 日(周三)早上去附近的森林公园玩了玩,时间太赶了,就出发回北京了,北京的路是真的堵,到北三环的时候,8km 的路开了整整半小时。这段路是我这几天开的最累的一回。回来后一嗨的服务真的好,因为我实际上是延迟还车了,晚到了 3 个小时,他们还贴心的帮我把借车晚到的半小时给减去了,也就是只算完了 2 个半小时。快到凌晨到家了。家里是真的热啊,还想继续浪啊。

本田 CRV


这辆车真的非常好开,优点如下

  1. 车里非常多的充电口(甚至还有 typec 充电口以及一个无线充电板)
  2. 自带 L2 辅助驾驶,跟车距离有 4 档可选。1 档非常适合北京的路况,跟车距离很近,不容易被加塞。
  3. 车辆稳定性非常的好,以至于 170km 都稳稳当当,而且风噪很低。比我的小破车强太多了。
  4. 空间很大,乘坐舒适性也非常的棒,开个 4 个小时也不是很累,大大的天窗看风景很棒。
  5. 支持 3 种前进档位,其中的 L 档,非常适合山地的长下坡和上坡。

Android 投屏技术

命令行

利用 screenrecord 和 ffmpeg 投屏

1
adb exec-out screenrecord --output-format h264 --size 640x310 - | ffmpeg -i - -f sdl -

可以根据选择自由调整屏幕

使用 Python PyAV 库解析

PyAV 是 python 的 ffmpeg 绑定,并且提供 wheel 包,就算没装 ffmpeg 也能用

1
2
3
4
5
6
7
8
9
10
11
12
13
14
15
16
17
18
19
20
21
22
23
24
25
26
27
28
import subprocess
import sys

import av


class Wrapper:
"""
Wrapper which only exposes the `read` method to avoid PyAV
trying to use `seek`.
"""

name = "<wrapped>"

def __init__(self, fh):
self._fh = fh

def read(self, buf_size):
return self._fh.read(buf_size)


wrapper = Wrapper(sys.stdin.buffer)
with av.open(wrapper, "r") as container:
for frame in container.decode():
print(frame)
pil_image = frame.to_image()
pil_image.save("test.jpg")
break

代码保存为test.py,通过下面的命令就可以解析

1
adb exec-out screenrecord --output-format=h264 - | python test.py

打开 test.jpg 就可能看到一张完美的截图了。

如果手机上没有 screenrecord 这个程序,也可以通过 scrcpy 来代替。这里就暂时不写了。

参考